The two panels you live in
Modoki is an Entity-Component-System engine built on koota. A game is a collection of entities; each entity holds data-only traits (components); systems run logic over them. The editor splits this across two panels: the Hierarchy lists the entities, and the Inspector shows the traits on whatever you have selected. Selecting an entity in one place selects it everywhere — pick a row in the Hierarchy and the same entity highlights in the SceneView, and vice-versa.
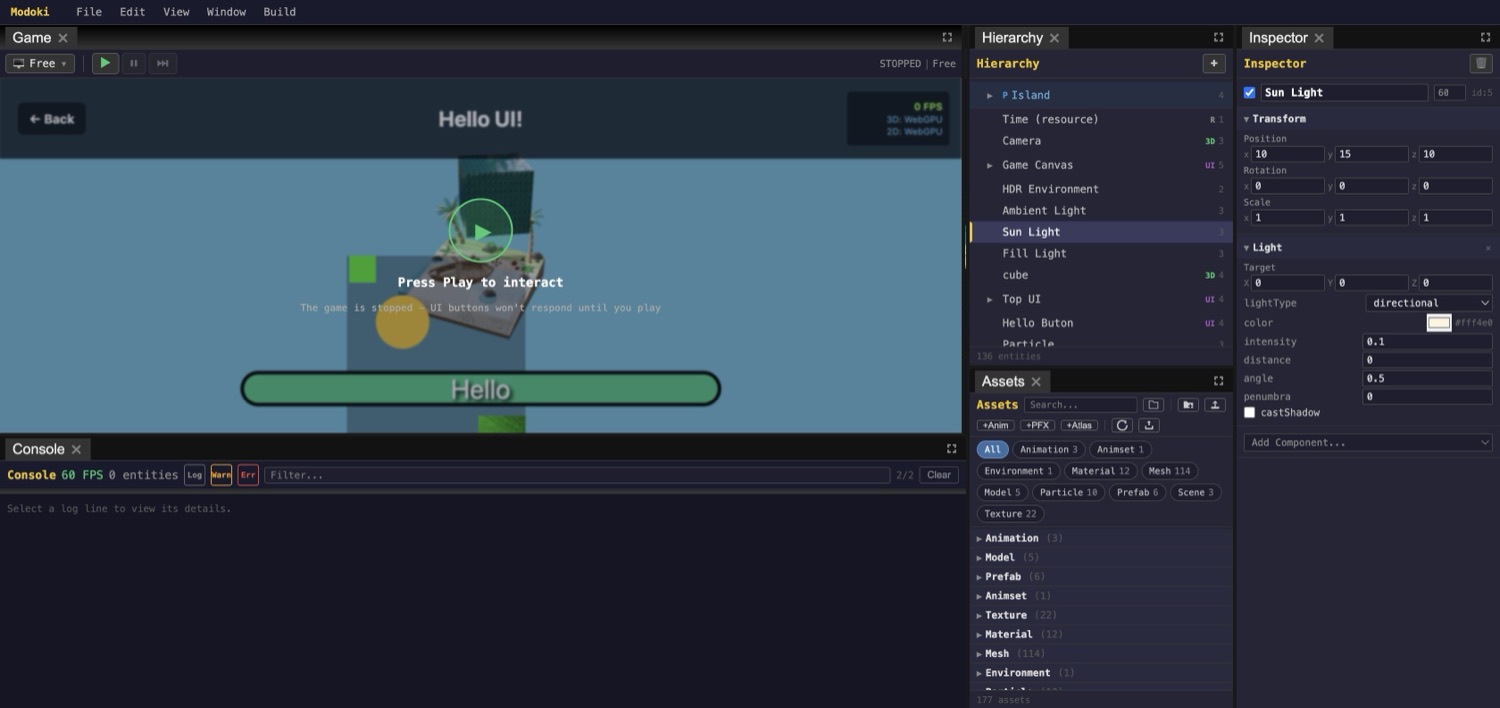
The Hierarchy panel
The Hierarchy is a tree of every entity in the scene — a real scene can run to 136 entities or more. Each row carries a layer tag so you can tell at a glance what an entity is:
- 3D — a Three.js entity
- UI — a DOM UI entity
- R — a resource entity, such as
Time
Prefab instances are badged with a blue P. The + button at the top of the panel creates a new entity.
Re-parenting and reordering
The tree is fully drag-driven. Drag one entity onto another to make it a child (re-parent it), or drag it between siblings to reorder. You can also drag a prefab out of the Assets panel and drop it into the Hierarchy to instantiate it — the new instance appears with its blue P badge.
The Inspector panel
The Inspector shows the currently selected entity (or, when you select an asset, that asset). For an entity, the top of the panel gives you an Active checkbox, the entity name, a sort-order field, and a delete button. Below that, each trait appears in its own collapsible section rendered with typed widgets:
- Number fields for scalar values
- Color swatch for colors
- Vector (x / y / z) for transforms and positions
- Checkbox for booleans
- Enum dropdown for fixed choices
For example, a Light trait exposes lightType (ambient / directional / point / spot), color, intensity, distance, angle, penumbra, and castShadow. Every edit you make writes straight to the live ECS world and pushes an undo entry, so changes show up immediately and are reversible.
There is no separate "apply" step — typing a new value or toggling a checkbox mutates the running world on the spot, and each change is recorded as its own undo entry.
Adding a trait
At the bottom of the Inspector, the Add Component… dropdown attaches a new trait to the selected entity. Available traits include Transform, Renderable3D, Renderable2D, Light, Camera, Environment, UIElement, UIAnchor, UIAction, Animator, ParticleEmitter, SkinnedModel, Bone, and more.
Walkthrough: tweak a light
- Find the entity Scan the Hierarchy for the light you want — look for a row tagged 3D — and click it.
- Confirm the selection The same entity highlights in the SceneView, and the Inspector switches to show its traits.
- Open the Light trait Expand the collapsible Light section in the Inspector.
- Adjust values Edit the
intensitynumber field, pick a newcolorfrom the swatch, or changelightTypewith the enum dropdown. Each change applies to the live world immediately. - Add more if needed Use Add Component… at the bottom to attach another trait, for example
Animator. - Undo a mistake Since every edit pushed an undo entry, you can step back any change you don't like.
Traits are data only. To make an entity do something, a system has to run logic over its traits — the Inspector edits the values those systems read.