What it is
The Animation editor authors .anim.json clips. A clip drives any trait field of any entity that lives under an Animator root entity — a UI anchor offset, a transform value, a color channel, anything numeric. You build tracks in the left Properties list, drop keyframes at the playhead, and then either rough out timing in the Dopesheet or shape easing precisely in the Curves view. While you scrub, the bound entities are live-posed in the SceneView so you author against what you actually see.
Opening a clip
A clip is always edited bound to an Animator, so the entity binding comes first:
- Open an existing clip: in the Hierarchy, select the entity that has the Animator trait, then double-click its
.anim.jsonin the Assets panel. The clip opens bound to that Animator. - Create a new clip: click +Anim in the Assets panel.
- Reopen later: when you reopen a clip, the editor auto-rebinds to the Animator that references it.
If nothing is bound, the editor shows an amber "No Animator bound" banner. You can still view the tracks, but you cannot record against a live entity until an Animator references the clip.
The toolbar
From left to right the toolbar gives you:
- Record (●) — when armed, editing any trait field keys the clip at the playhead.
- Transport — jump-to-start, previous frame, Play/Pause, next frame, and Stop (returns to start).
- Current frame field and a time readout (e.g.
0.00s). - The clip name.
- Samples — the frame rate (fps).
- Len — the clip duration in seconds.
- A Loop toggle.
- ◆+ — add a key at the playhead for every track at once.
- Undo / Redo.
- An auto-save status indicator on the right.
Properties and tracks
The left column is the Properties list: one row per track, labeled Trait.field (for example UIAnchor.left) together with the entity path (for example Back Button). Each row has a remove-property button.
Click + Add Property to open the picker: browse the Animator root's entity subtree, pick an entity, then pick an animatable field. A first keyframe is seeded at the playhead from the entity's current value, so the track starts where the entity already is.
At the bottom of this column, a Dopesheet | Curves tab toggle switches the right-hand view.
Adding keyframes
There are three ways to set a key:
- With Record armed, just edit a trait — in the Inspector or by dragging a gizmo — and a key lands at the playhead.
- Press ◆+ (shortcut K) to key all tracks at once.
- Double-click empty space in a Dopesheet row, or in the Curves graph, to add a key there.
Dopesheet view
The Dopesheet is a timing view. Each track is a row of diamond keyframes laid out on the timeline ruler — use it to see and adjust when things happen, independent of their values.
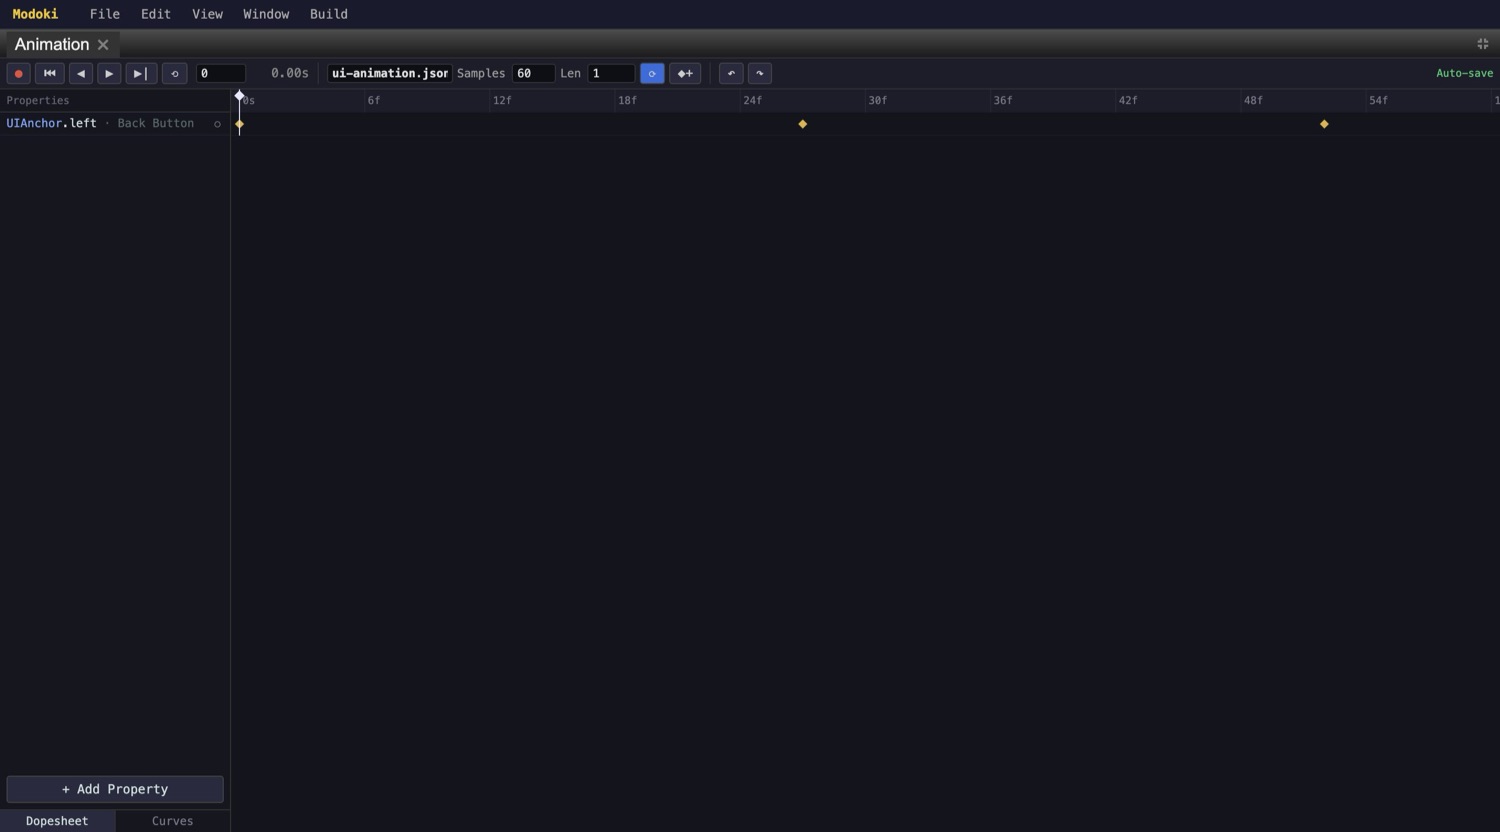
In this view you can:
- Drag a diamond to retime that key.
- Drag a marquee to box-select several keys.
- Double-click a diamond to delete it.
- Drag the ruler to scrub the playhead.
Curves view (the curve editor)
The Curves view graphs each numeric track as a value-vs-time curve so you can shape easing precisely.
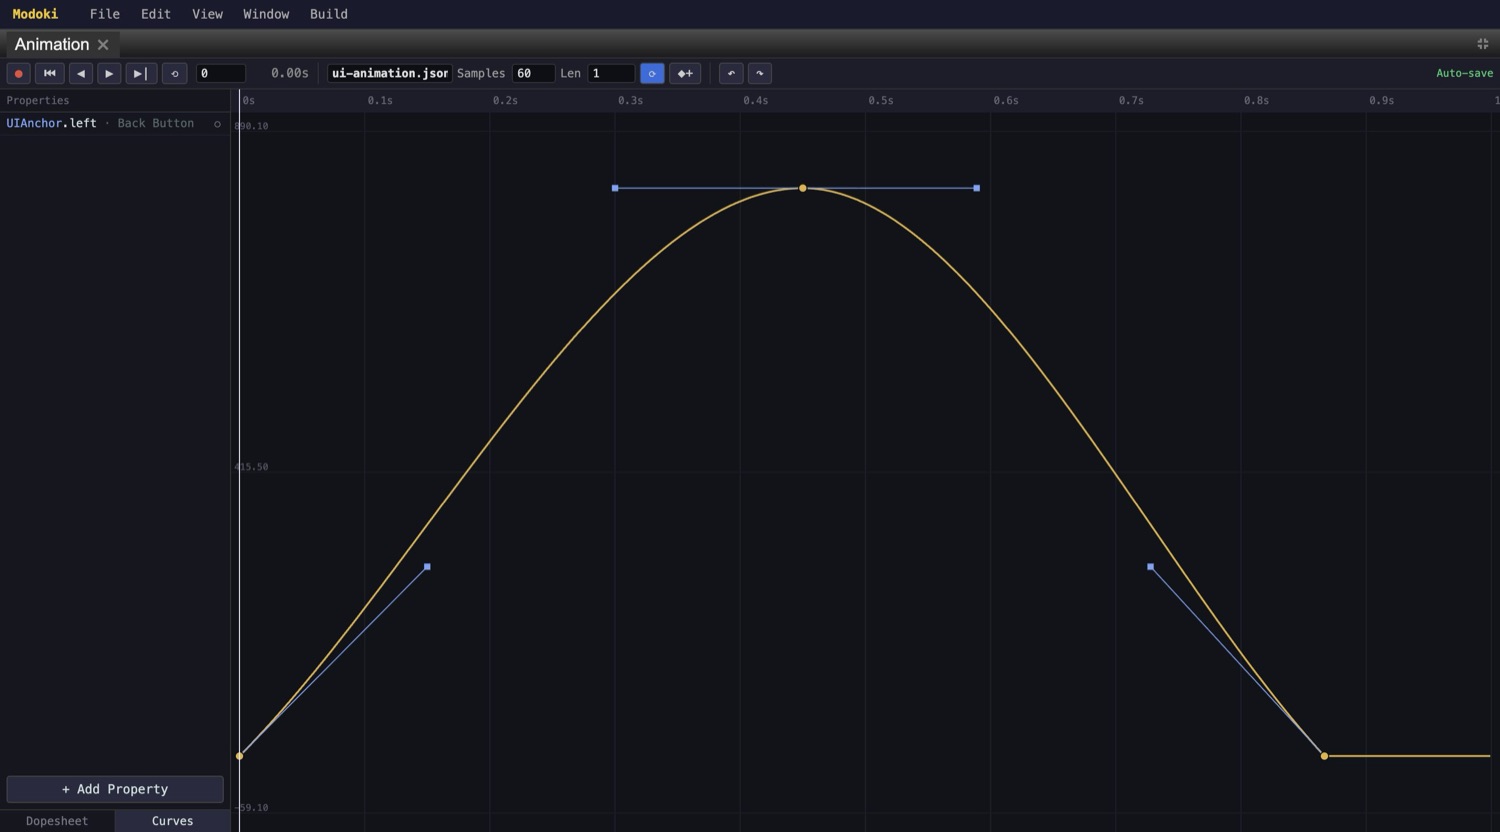
Keyframes are draggable dots: a key's time clamps between its neighbors, while its value is free. Each key shows blue Bezier in/out tangent handles — drag a handle to set the slope (and weight) of the curve passing through that key. The top ruler scrubs the playhead, and the value axis auto-fits to the visible keys.
Right-click a key for tangent presets:
- Auto (smooth)
- Linear
- Constant (stepped)
- Free (broken)
- Delete key
Scrubbing & preview
Move the playhead by dragging the ruler, typing a frame, or using the keyboard. As you scrub, the bound entities are live-posed in the SceneView so you see the animation while you author it.
- , / . — previous / next frame.
- Alt+, / Alt+. — jump to previous / next keyframe.
- Space — play / pause.
- K — key all tracks.
- Delete — remove selected keys.
Edits auto-save (debounced) and use the editor's shared undo stack, so Undo / Redo here is the same history you use everywhere else in the editor.
Animate a property end to end
- Select the Animator entity and open the clip In the Hierarchy, select the entity that has the Animator trait. Double-click its
.anim.jsonin the Assets panel to open the clip bound to that Animator — or click +Anim to create a new one. Confirm there is no amber "No Animator bound" banner; if there is, the clip isn't referenced by an Animator yet. - Add a property to create a track Click + Add Property, browse the Animator root's subtree, pick the target entity, then pick the field you want to animate (for example
UIAnchor.lefton "Back Button"). A first keyframe is seeded at the playhead from the entity's current value. - Arm Record and set values at a few frames Click Record (●). Move the playhead to a frame (type it, drag the ruler, or use .), then change the value in the Inspector or by dragging the gizmo — a key lands at the playhead. Repeat at a couple more frames. To capture every track at the current frame in one shot, press ◆+ (K).
- Switch to Curves and shape the easing Flip the bottom toggle to Curves. Drag a keyframe dot to fine-tune its value, then drag its blue in/out tangent handles to set the slope through the key. For a quick result, right-click a key and choose a preset — Auto (smooth), Linear, Constant (stepped), or Free (broken).
- Scrub and preview Press Space to play/pause, or step with , / . and jump between keys with Alt+, / Alt+.. The bound entity poses live in the SceneView as you scrub. Your edits auto-save as you go.